

How to Add a Shared Mailbox in Outlook (Complete Guide for All Versions)
Email is still one of the most important tools for everyday business communication. But when multiple people are involved, things can quickly become confusing. Messages get buried, replies overlap, and sometimes no one is sure who is responsible for responding. Over time, this creates delays, frustration, and missed opportunities.
This is exactly why many teams rely on shared mailboxes. Instead of managing emails individually, everyone works from a single, shared space where communication becomes more organized and transparent.
If you’ve been trying to figure out how to add a shared mailbox in Outlook, this guide will walk you through everything in a clear and practical way. You’ll learn not only the steps but also how shared mailboxes actually improve teamwork and workflow.
Understanding Shared Mailboxes in Outlook
Before jumping into steps, it’s important to understand what a shared mailbox actually is and why it matters.
A shared mailbox is a central email account that multiple users can access from within their own Outlook accounts. Instead of logging in separately, users are given permission to open, read, and respond to emails from that mailbox.
For example, when a customer sends an email to a support address, the entire team can see it. Anyone can reply, and everyone else can see that the issue has already been handled. This eliminates confusion and creates a smoother workflow.
When you learn how to add a shared mailbox in Outlook, you are essentially learning how to connect your account to this shared communication system.
Why Shared Mailboxes Are Important for Teams
Many organizations don’t realize how much time they lose due to poor email coordination. Shared mailboxes solve this problem in a very practical way.
They allow teams to work together without constantly forwarding emails or checking with each other. Everyone has visibility, which improves response time and accountability.
Another major benefit is consistency. When you send emails from a shared mailbox, customers always see the same email address. This creates a professional image and builds trust over time.
Whether you’re exploring how to add a shared mailbox in Outlook 365 or setting it up on Mac, the benefits remain the same across all platforms.
What You Need Before Adding a Shared Mailbox
Before you start the process of how to add a shared mailbox in Outlook, there are a few essential things to check.
First, you must have permission to access the mailbox. This is usually granted by your organization’s administrator. Without proper access, the mailbox simply won’t appear, no matter how many times you try to add it.
Second, the shared mailbox must already exist. If it hasn’t been created yet, you’ll need to request it.
Finally, your Outlook account should be connected to Microsoft 365 or an Exchange server. This ensures that everything syncs correctly when you try to add the mailbox.
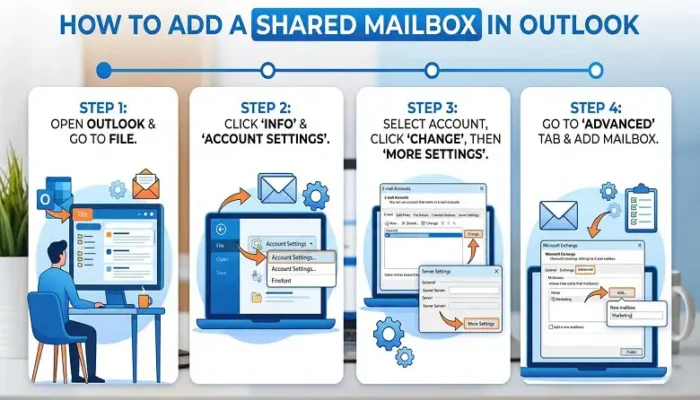
How to Add a Shared Mailbox in Outlook (Windows Desktop)
If you’re using the classic Outlook desktop application, the process can be either automatic or manual depending on your setup.
Automatic Method (Easiest Way)
In many cases, you don’t actually need to do anything. Once your admin gives you access, Outlook automatically adds the shared mailbox to your account.
Close Outlook completely and reopen it. After restarting, check your folder list. If the mailbox appears, then the process of how to add a shared mailbox in Outlook is already complete.
This automatic feature saves time and is the most common way users gain access.
Manual Method (When Automatic Doesn’t Work)
If the mailbox doesn’t show up, you’ll need to add it manually.
Open Outlook and go to your account settings. From there, access advanced settings and look for the option to add another mailbox. Enter the shared mailbox email address and confirm your changes.
After restarting Outlook, the mailbox should appear in your sidebar.
This method is especially useful when troubleshooting issues related to how to add a shared mailbox in Outlook, as it gives you direct control over the setup.
Adding as a Separate Account
There are situations where the standard methods don’t work. In such cases, adding the shared mailbox as a separate account can help.
This approach allows Outlook to treat the mailbox as an additional account while still using your existing credentials. It’s not always necessary, but it can be very effective when other methods fail.
How to Add a Shared Mailbox in Outlook 365
Outlook 365 is widely used in modern workplaces, and many users specifically search for how to add a shared mailbox in Outlook 365.
Automatic Setup in Outlook 365
Just like the desktop version, Outlook 365 often adds shared mailboxes automatically.
Once permissions are granted, simply restart Outlook. The mailbox should appear without any manual effort.
This seamless integration is one of the reasons Outlook 365 is so popular in business environments.
Manual Setup in Outlook 365
If the mailbox doesn’t appear automatically, you can add it manually through account settings.
Navigate to your account settings, open advanced options, and add the shared mailbox. The process is similar to the desktop version but feels more streamlined due to the modern interface.
Understanding this method ensures that how to add a shared mailbox in Outlook 365 becomes easy, even when automatic setup fails.
Alternative Approach
Another way to complete how to add a shared mailbox in Outlook 365 is by using the “Add Account” option.
This method is helpful when the usual steps don’t work, as it allows Outlook to recognize the mailbox in a different way.
How to Add a Shared Mailbox in New Outlook
The new Outlook has been redesigned to simplify user experience. If you’re learning how to add a shared mailbox in new Outlook, you’ll notice that the process is much faster.
Simple Add Option
In the new Outlook, you can add a shared mailbox directly from the sidebar.
Right-click your account, select the option to add a shared mailbox, and enter the email address. Within seconds, the mailbox is added.
This is by far the easiest method among all versions.
Using Shared Section
Another way to add a mailbox in the new interface is through the Shared with me section.
This feature automatically lists mailboxes you have access to, making it even easier to complete how to add a shared mailbox in new Outlook without manual configuration.
When It Doesn’t Work
Sometimes, even simple systems need a refresh.
If the mailbox doesn’t appear, restart Outlook or wait a few minutes. Permissions may still be syncing in the background.
How to Add a Shared Mailbox in Outlook Mac
Mac users often wonder if the process is different, and while the interface changes slightly, the concept remains the same.
Accessing Settings on Mac
To begin how to add a shared mailbox in Outlook Mac, open Outlook and go to the Tools menu. From there, access your account settings and advanced options.
Adding the Mailbox
Enter the shared mailbox email address and add it to your account. Once done, restart Outlook to complete the process.
This ensures that the mailbox appears correctly in your sidebar.
Important Note for Mac Users
Outlook for Mac uses cached data, which means changes may not appear instantly.
If the mailbox doesn’t show up right away, restarting the app usually solves the problem.
Using a Shared Mailbox After Setup
After you understand how to add a shared mailbox in Outlook, the next step is using it effectively.
Sending Emails from the Shared Mailbox
When composing an email, you can select the shared mailbox as the sender.
This ensures that all communication comes from the shared address, which keeps messaging consistent and professional.
Team Collaboration in Action
Shared mailboxes allow multiple users to manage emails together.
Instead of asking who replied to what, everyone can see the conversation history. This improves coordination and reduces confusion.
Shared Calendar Benefits
Many shared mailboxes include a calendar that teams can use.
This makes scheduling easier and helps keep everyone aligned on meetings and deadlines.
Common Problems and Solutions
Even when you know how to add a shared mailbox in Outlook, issues can still happen.
Mailbox Not Showing
This is usually a syncing issue.
Restart Outlook or wait a few minutes for permissions to update.
Cannot Send Emails
If you can’t send emails, you likely don’t have the correct permissions.
Ask your admin to grant Send As access.
Duplicate Mailbox
Sometimes the mailbox appears twice.
This happens when both automatic and manual methods are used. Removing one version fixes the issue.
Final Thoughts
Learning how to add a shared mailbox in Outlook is a small step that can make a big difference in how your team communicates. Instead of dealing with scattered emails and unclear responsibilities, you create a system where everything is visible and organized.
Whether you’re working on Windows, Mac, or using different Outlook versions, the core idea remains the same—shared access leads to better collaboration.
Once everything is set up and your team starts using it regularly, email management becomes simpler, faster, and far more efficient.